-
How to program your Arduino Uno with an AVRISP mkII
(For those who don't have the original board for uploading sketches)
Have an AVRISP mkII that you want to use to program your Arduino Uno and still use the Arduino IDE? Well this post will show you how.This post assumes you have an Arduino Uno, running Windows XP, and have the latest IDE software (version 0022 as of this post).The main reason I wanted to go this route was because of the start up lag. The lag is used by the Arduino IDE when you program via USB. The Arduino IDE will reset your Uno which fires up the bootloader to check for a new incoming program. This half a second or so lag will always be there on start-up and I wanted to get rid of it. Another draw back is that if you have stuff connected to the pins that is used for the serial communications, you could get erroneous data as those pins are checking for incoming serial data.
This procedure is rather simple. All you need to do is modify the boards.txt file. Boards.txt should be located in the Arduino folder. Hardware > Arduino > Boards.txt
Add this code in there and then save it after:
###########################unoisp.name=Arduino Uno w/ AVR ISP MKii
unoisp.upload.protocol=avrispmkii
unoisp.upload.using=avrispmkii
unoisp.upload.maximum_size=32256
unoisp.upload.speed=115200
unoisp.bootloader.low_fuses=0xff
unoisp.bootloader.high_fuses=0xde
unoisp.bootloader.extended_fuses=0×05
unoisp.bootloader.path=optiboot
unoisp.bootloader.file=optiboot_atmega328.hex
unoisp.bootloader.unlock_bits=0x3F
unoisp.bootloader.lock_bits=0x0F
unoisp.build.mcu=atmega328p
unoisp.build.f_cpu=16000000L
unoisp.build.core=arduino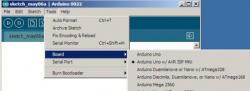
Now fire up the Arduino IDE and you’ll notice a new option available under Tools > Board. It’s called Arduino Uno w/ AVR ISP MKii. That’s pretty much it! Make sure you that option selected before you hit the upload button.
Note 1: If you have any issues with the speed and time of the programs, use the AVRISP to burn a fresh bootloader for your Arduino Uno and then try again. Burning the bootloader will set the internal fuses on the ATMEGA328 so that it works correctly on the board.Note 2: If you have issues with it not responding to the AVRISP then you may have issues with the driver. A driver comes with the IDE download called libusb. When trying to update the driver, it is located in the Arduino folder. Hardware > Tools > avr > utils > libusb > bin.
Programming your Arduino with an AVRISP mkII with the new 1.0 IDE
A while back a wrote up instructions on how to program an Arduino with an AVRISP mkII.
Back then the current software for the Arduino IDE was set at 0022 and it required you to modify a file to get it work.
Apparently enough people wanted a feature like that to come built into the Arduino IDE that it has now become reality. No more modifying of files.It’s extremely easy to do know and I’ll show you exactly how to do it, so go ahead and fire up the Arduino IDE, plug in your programmer (I’m still using an AVRISP mkII) and plug up your Arduino Uno to an external supply and to your programmer.
First select which board you plan on using:
Next select the programmer you plan on using:
Lastly, when you are ready to upload your sketch to your Arduino, hold the the shift key when you push the upload button. You’ll notice the words change when you hover your mouser over it while hitting the shift key.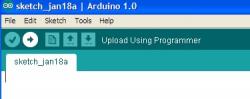
That’s it! Simple as pie. Using this method you will bypass the Arduino bootloader, freeing up some flash memory as well as avoiding the initial startup sequence that needs to be used for the tradition sketch upload.
Here is the driver I use on my computer so that the AVRISP connects correctly and can be used by the Arduino IDE to program your board or burn the bootloader. Save it, and unzip it. It is a dll file. To use, go into the device manager and find AVRISP (not sure what it may be called in your system), and update the driver for it using the one I provided (it’s also buried in the Arduino folder). Normally its the device with the yellow exclamation symbol if it has no current driver.
The driver I have is not digitally signed, but you should be able to navigate through the error message and force it to update.
AVRISP mkII driver for Arduino© Jhon Dimo Blog
Any other questions or problems? Leave me a comment and I’ll responds as soon as possible to help you out.
 votre commentaire
-
PICkit 3 In-Circuit Debugger
Microchip’s PICkit 3 In-Circuit Debugger/Programmer uses in-circuit debugging logic incorporated into each chip with Flash memory to provide a low-cost hardware debugger and programmer. In-circuit debugging offers these benefits:
- Low cost
- Minimum of additional hardware needed for debug
- Expensive sockets or adapters are not required
The PICkit 3 can now also reprogram any PIC microcontroller
with a simple push of a button.

Note: The PICkit 3 In-Circuit Debugger/Programmer is NOT a production programmer. It should be used for development purposes only.
The MPLAB PICkit 3 allows debugging and programming of PIC® and dsPIC® Flash microcontrollers at a most affordable price point using the powerful graphical user interface of the MPLAB Integrated Development Environment (IDE). The MPLAB PICkit 3 is connected to the design engineer's PC using a full speed USB interface and can be connected to the target via an Microchip debug (RJ-11) connector (compatible with MPLAB ICD 2, MPLAB ICD 3 and MPLAB REAL ICE). The connector uses two device I/O pins and the reset line to implement in-circuit debugging and In-Circuit Serial Programming™.
PICkit 3 Features
- USB (Full speed 12 Mbits/s interface to host PC)
- Real-time execution
- MPLAB IDE compatible (free copy included)
- Built-in over-voltage/short circuit monitor
- Firmware upgradeable from PC/web download
- Totally enclosed
- Supports low voltage to 2.0 volts (2.0v to 6.0v range)
- Diagnostic LEDs (power, busy, error)
- Read/write program and data memory of microcontroller
- Erase of program memory space with verification
- Freeze-peripherals at breakpoint
- Program up to 512K byte flash with the Programmer-to-Go
Header Information
Some 8-, 14- and 18-pin devices use small header boards with a special MCU for debugging. This special MCU has extra pins for PICkit 3 communication and therefore allows the use of all pins on the part for the application. The header board is not used or needed for programming. However, when debugging these devices the header must be used. See the "Header Specification" document below or see a list of current devices that use headers here.
votre commentaire
-
-
-
Des chercheurs de l’université de Stanford (Californie) ont créé un drone-avion totalement autonome et capable de se poser de lui-même sur une surface verticale comme un mur. Ils se sont inspirés de l’écureuil volant, par exemple pour la trajectoire, la vitesse de vol et la manœuvre périlleuse de fixation au support.
 votre commentaire
 Suivre le flux RSS des articles Suivre le flux RSS des commentaires


|
|
|
|